刷写固件
编译系统源码后,打包后生成的系统文件称之为固件。固件一般为.img格式。把固件下载到开发板或者产品上的过程称之为烧写固件。
烧录模式
R128 有两种烧录模式,分别为 USB 烧录与UART烧录。烧录模式以芯片 RST 时 PA1,PA2 引脚高低电平控制。
R128 Module 默认配置为 USB 烧录,PA2 已经在模组通过下拉电阻下拉。
| PA1 | PA2 | 模式 |
|---|---|---|
| 1 | 1 | 非法模式 |
| 1 | 0 | 正常启动 |
| 0 | 1 | UART 下载 |
| 0 | 0 | USB 下载 |
USB 烧写
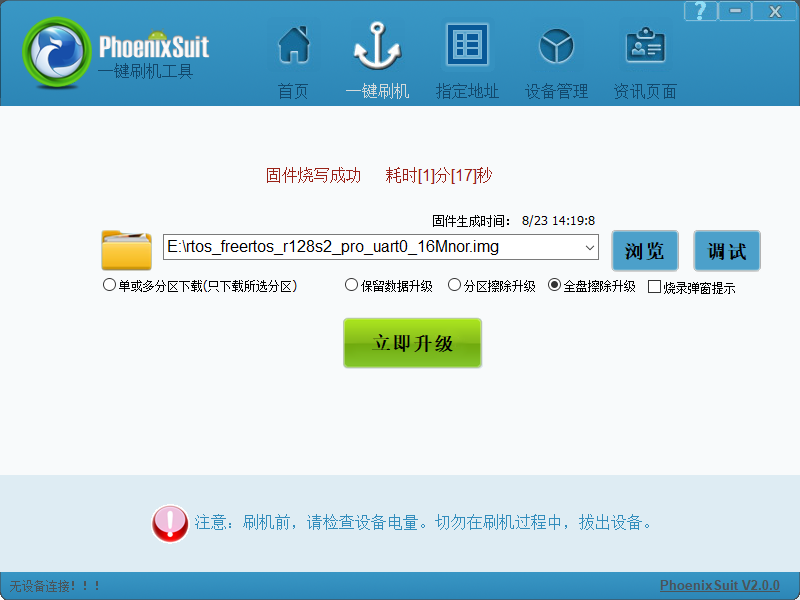
R128 支持使用 USB 烧写系统。对于 Windows 用户可以使用 PhoenixSuit 进行烧写。是最常用的烧写工具,通过数据线将PC和开发板连接,把固件烧到开发板上。PhoenixSuit 支持分区烧写,适用于开发和小规模生产使用。
PhoenixSuit - Windows
-
打开PhoenixSuit
-
点击浏览,选择固件
-
点击全盘擦除升级
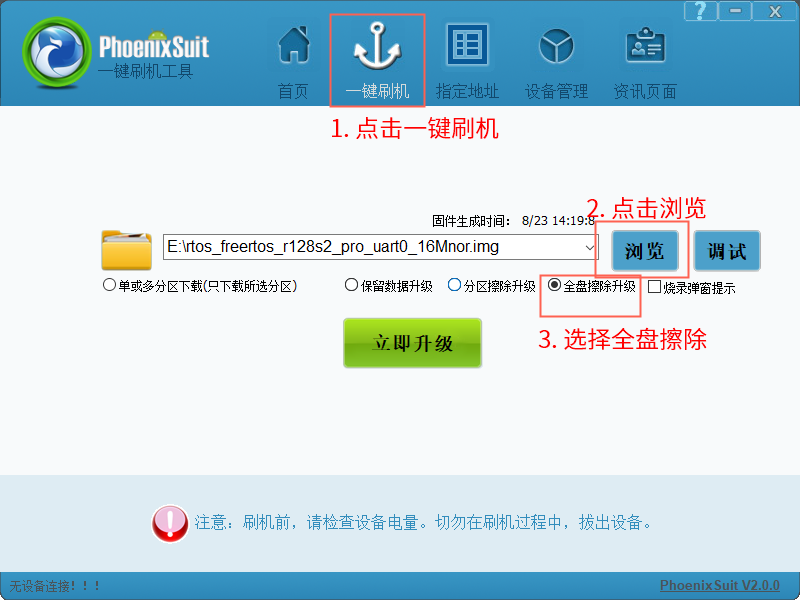
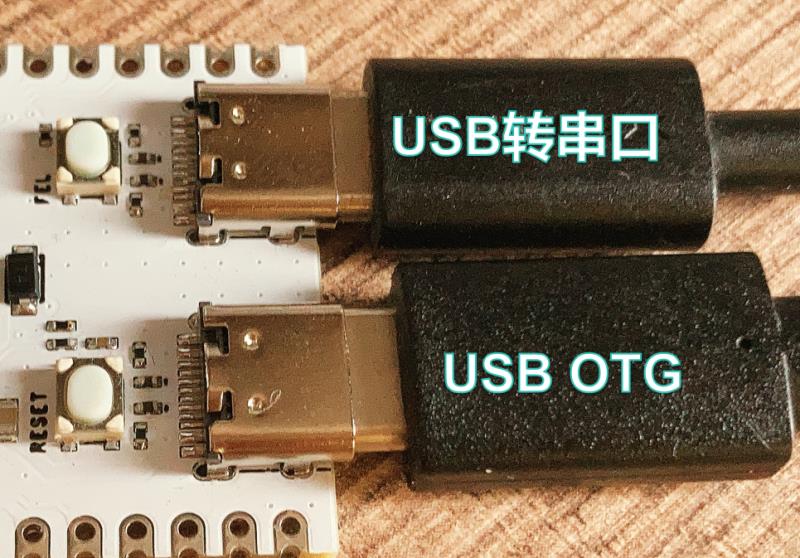
- 使用 USB 数据线连接 USB OTG (USB转串口也可以连接,用于烧录查错)
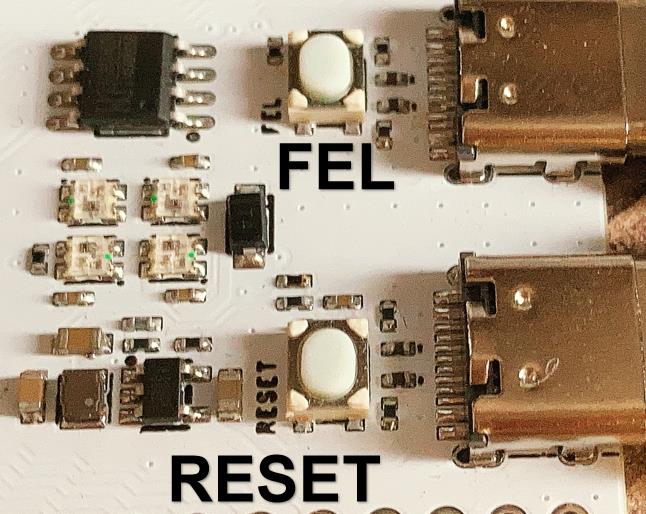
- 按住
FEL键,然后点击RESET键重置开发板
RESET点击后 PhoenixSuit 会自动进入烧录模式,开始下载
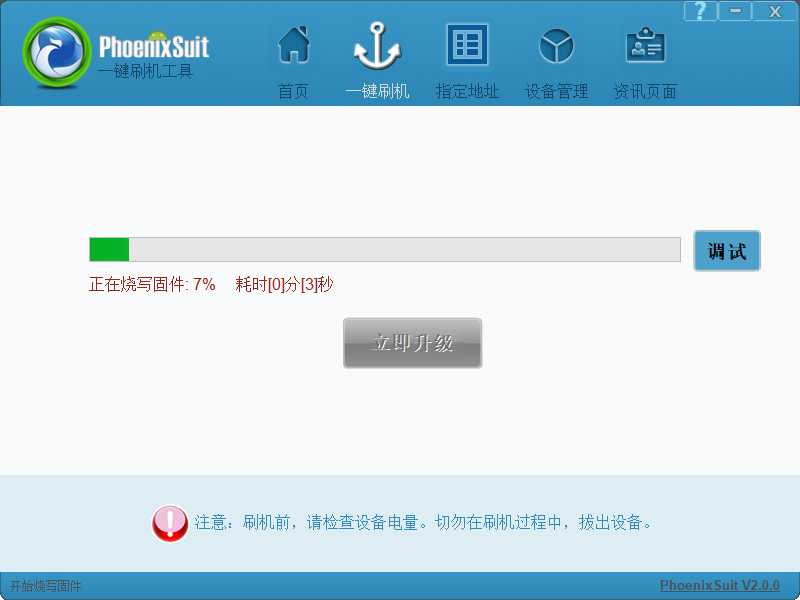
- 烧录完成
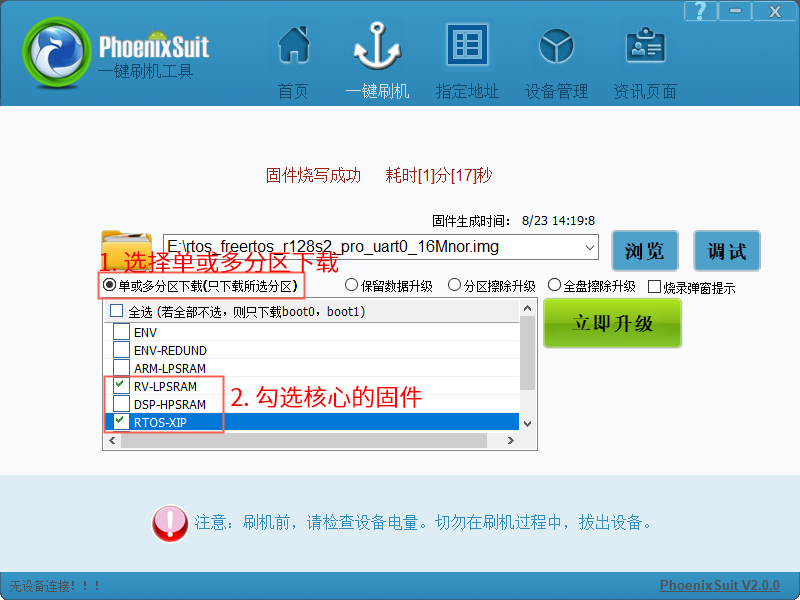
PhoenixSuit 单独分区烧录
在开发的时候,会遇到只需要烧录单独分区的情况,例如只修改了 RV 核心的固件,不需要全盘下载。就可以选择单独分区烧录功能。
- 选择单或多分区下载,PhoenixSuit 会解析固件并生成分区表
- 选择需要下载的核心的固件
PhoenixSuit - Linux
Linux 版本 PhoenixSuit 支持的发行版本包括 Ubuntu、Fedora、Redhat 及 CentOS 等几个常见的发行版本。目前驱动已经可以支持 4.11.0 版本以上内核,建议安装内核版本号大于4.11.0 的 Linux 发行版本。
安装 PhoenixSuit - Linux
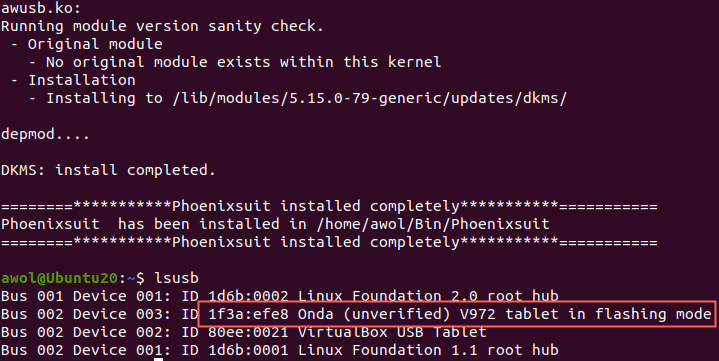
- 下载 PhoenixSuit 到 Linux 中,解压

- 安装依赖 dkms,对于 Ubuntu 可以用
sudo apt install dkms dctrl_tools来安装

- 打开终端,输入
sudo ./PhoenixSuit.run来运行安装程序。

- 使用 USB 数据线连接 USB OTG (USB转串口也可以连接,用于烧录查错)
- 按住
FEL键,然后点击RESET键重置开发板使其进入下载模式
- 安装完成后可以用
lsusb查看 USB 设备,找到ID 1f3a:efe8,找到即安装完成。
烧录
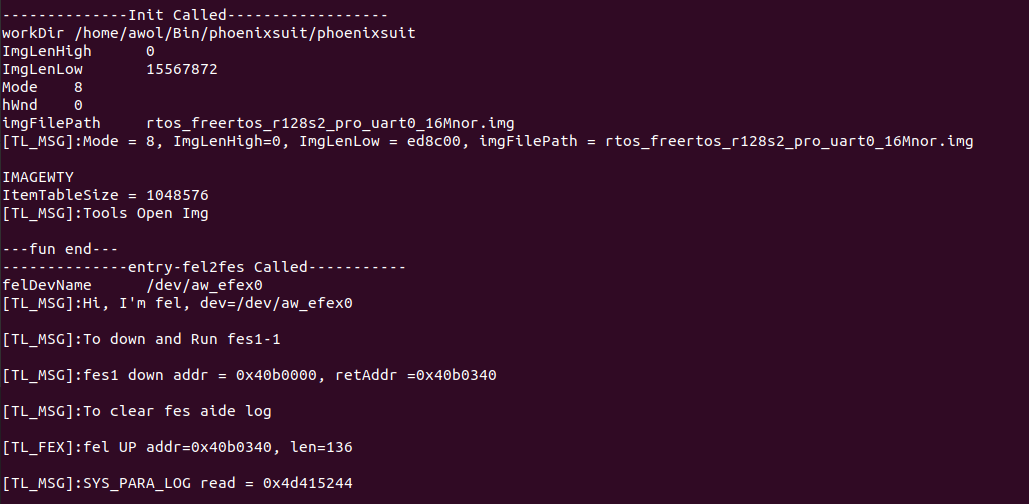
- 使用命令
sudo ./PhoenixSuit rtos_xxx_uart0_16Mnor.img下载烧录rtos_xxx_uart0_16Mnor.img
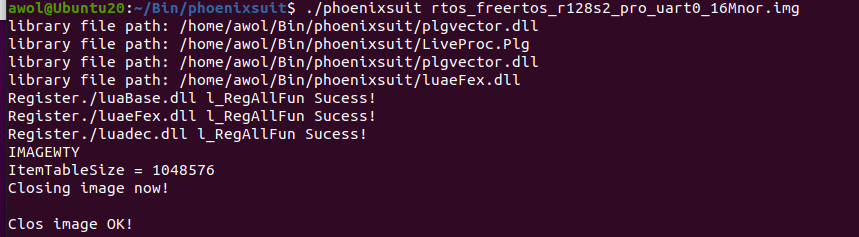
- 显示
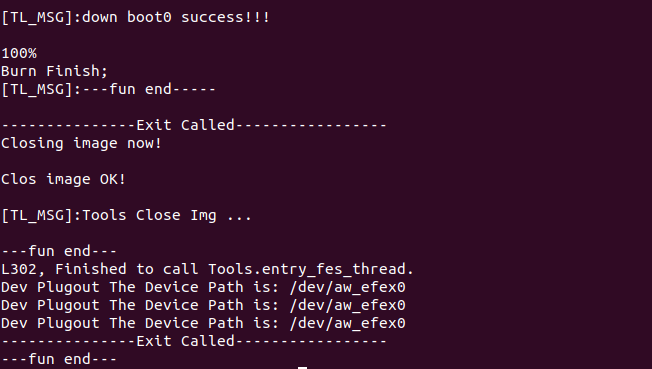
Clos image OK!时,按住FEL引脚,点击RESET键使芯片进入下载模式
- 开始烧录
- 烧录完成
虚拟机 Linux 烧录
- 如果使用的是虚拟机连接开发板烧录,先运行
sudo ./PhoenixSuit rtos_xxx_uart0_16Mnor.img下载烧录rtos_xxx_uart0_16Mnor.img,先进入下载模式。
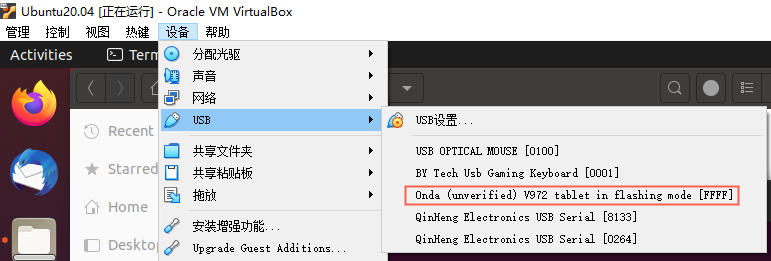
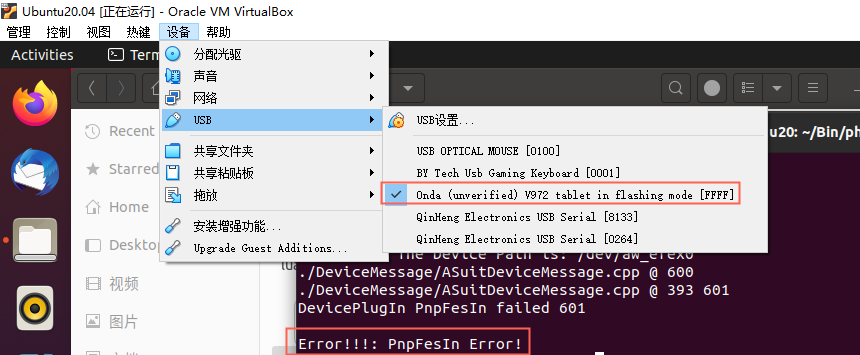
- 选择设备-USB,选择 Onda 设备连接虚拟机

- 开始烧录,但是运行到
Dev Plugout The Device Path is /dev/aw_efex0会卡住
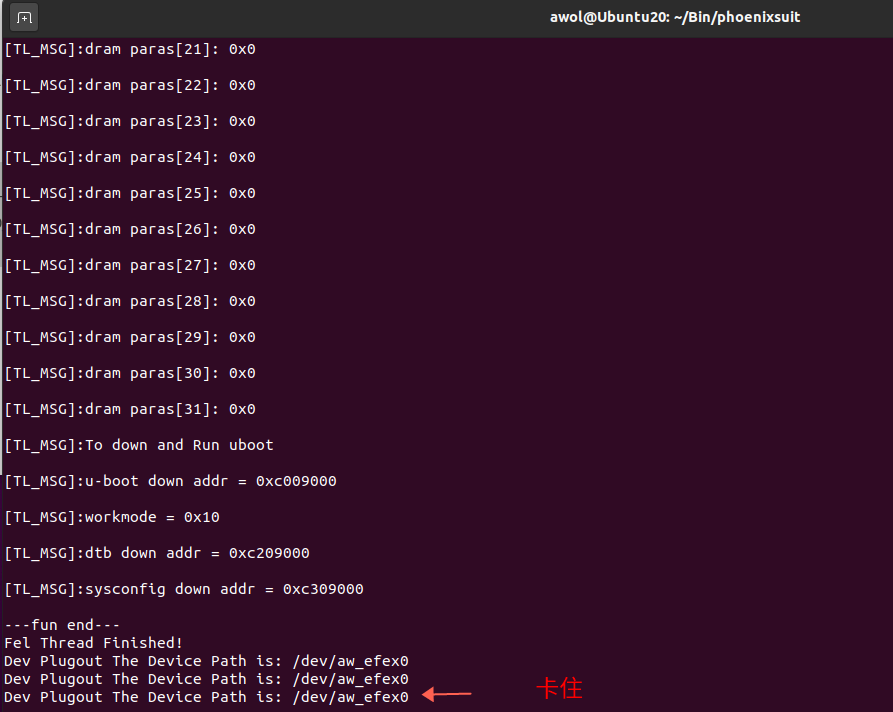
- 此时需要重新到 设备-USB 重新连接 USB 设备,这是因为芯片烧录时需要重置USB,导致USB编号变化,虚拟机不会自动连接。
- 开始下载
- 如果长时间没有重新连接 USB 设备,PhoenixSuit 会超时自动退出,报错如下
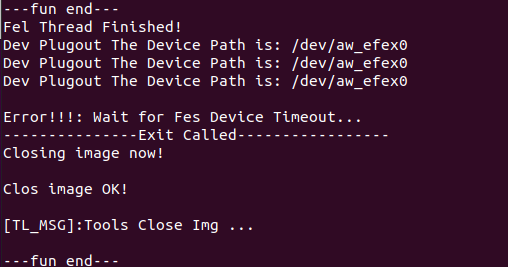
- 如果刚才长时间没有重新连接,超时后连接上 USB 设备,重新运行
sudo ./PhoenixSuit rtos_xxx_uart0_16Mnor.img下载命令。会出现Errpr!!!: PnpFesIn Error!这是因为烧录启动时的 USB 模式不匹配导致的,之前的操作导致USB进入了FFFF模式。此时需要按住FEL引脚,点击RESET键使芯片进入下载模式重新下载(下载模式会显示02B3)
PhoenixSuit - MacOS
- 下载解压
PhoneixSuit_MacOS.zip - 在 Mac 电脑中进入终端,将目录切到工具目录下
- 执行命令
chmod 777 ./phoenixsuit赋予运行权限 - 使用命令
./phoenixsuit rtos_xxx_uart0_16Mnor.img下载烧录rtos_xxx_uart0_16Mnor.img - 设备重新到 boot 的时候会自动进行烧写
- 烧写成功,设备重启

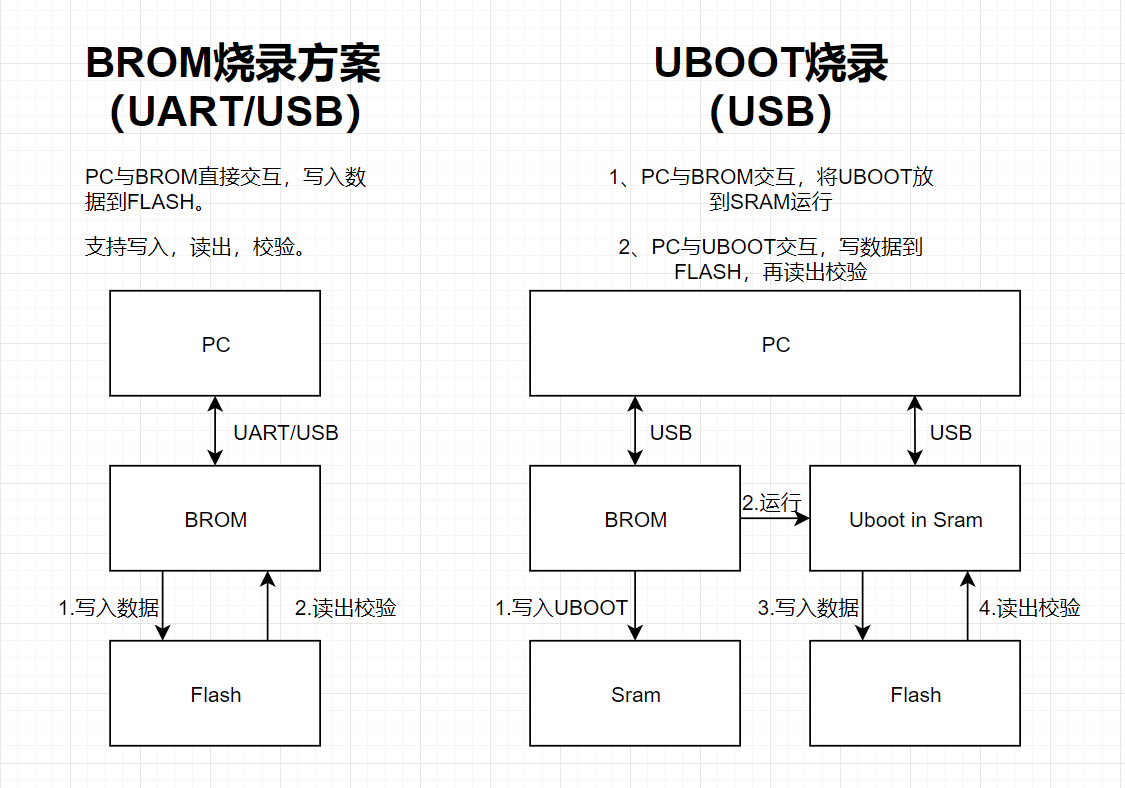
USB 烧写的流程
R128 系统的烧写流程如下:
- 片内引导 BROM 初始化芯片,识别到 PA1,PA2 脚为 USB 烧录模式,初始化 USB
- 上位机通过 USB 烧写 BOOT0 到 SRAM 中,并运行 BOOT0
- BOOT0 初始化 PSRAM,返回完成信号等待上位机下载 BOOT1(U-Boot)
- 上位机收到信号,下载 BOOT1(U-Boot)到 PSRAM 中,并引导运行 BOOT1(U-Boot)
- BOOT1(U-Boot) 初始化系统资源,初始化内部 SPI NOR,USB2.0 等资源,等待上位机下载
- 上位机下发固件,进入烧写模式,烧写固件
USB 烧录 log
[0]fes begin commit:61c5f1c6
[2]set pll end
[3]board init ok
[5]fake dram ok
[7]heap: 0x40a0000 size:0xe000
[9]lpsram init
[11]lspsram init aps64
[13]lspsram dqs:0x011b01b0
[18]psram chip APS64 init ok!, freq 1920000000
[22]Init psram controller ok
[24]hpsram init
[26]DRAM DQS gate is PD mode.
[29]DRAM BOOT DRIVE INFO 001: V2.00
[32]DRAM CLK = 800 MHZ
[34]dram_tpr11 = 0x0 , dram_tpr12 =0x0
[38]dram_tpr9 = 0x2222
[68]DRAM simple test OK.
[70]DRAM SIZE =8 MB
[82]fes1 done


U-Boot 2018.05-g024e8cd (Jul 04 2023 - 03:57:33 +0000) Allwinner Technology

[01.080]CPU:   Allwinner Family
[01.083]Model: sun20iw2
[01.086]DRAM:  8 MiB
[01.096]Relocation Offset is: 00799000
[01.131]secure enable bit: 0
[01.135]CPU=384 MHz,PLL6=192 Mhz,AHB=192 Mhz, APB1=96Mhz  MBus=4125Mhz
[01.142]sunxi flash type@0 not support fast burn key
[01.146]flash init start
[01.149]workmode = 16,storage type = 0
try card 0
set card number 0
get card number 0
[01.157][mmc]: mmc driver ver uboot2018:2021-07-19 14:09:00
[01.166][mmc]: get sdc_type fail and use default host:tm1.
[01.209][mmc]: can't find node "mmc0",will add new node
[01.214][mmc]: fdt err returned <no error>
[01.218][mmc]: Using default timing para
[01.221][mmc]: SUNXI SDMMC Controller Version:0x50310
[01.235][mmc]: mmc 0 cmd timeout 100 status 100
[01.240][mmc]: smc 0 err, cmd 8,  RTO
[01.243][mmc]: mmc 0 close bus gating and reset
[01.248][mmc]: mmc 0 cmd timeout 100 status 100
[01.253][mmc]: smc 0 err, cmd 55,  RTO
[01.256][mmc]: mmc 0 close bus gating and reset
[01.265][mmc]: mmc 0 cmd timeout 100 status 100
[01.269][mmc]: smc 0 err, cmd 1,  RTO
[01.272][mmc]: mmc 0 close bus gating and reset
[01.277][mmc]: Card did not respond to voltage select!
[01.282][mmc]: mmc_init: -95, time 56
[01.285][mmc]: mmc_init: mmc init fail, err -95
MMC init failed
try emmc fail
spi sunxi_slave->max_hz:50000000
sr3:0x68 --> 0x68
SF: Detected w25q128 with flag 0x301 with page size 256 Bytes, erase size 4 KiB, total 16 MiB
not boot mode, unlock all
[01.360]Loading Environment from SUNXI_FLASH... OK
[01.369]try to burn key
[01.372]out of usb burn from boot: not need burn key
Hit any key to stop autoboot:  0
sunxi work mode=0x10
run usb efex
delay time 2500
weak:otg_phy_config
usb init ok
set address 0xe
set address 0xe ok
SUNXI_EFEX_ERASE_TAG
erase_flag = 0x12
origin_erase_flag = 0x1
FEX_CMD_fes_verify_status
FEX_CMD_fes_verify last err=0
the 0 mbr table is ok
*************MBR DUMP***************
total mbr part 9

part[0] name      :env
part[0] classname :DISK
part[0] addrlo    :0x20
part[0] lenlo     :0x8
part[0] user_type :32768
part[0] keydata   :0
part[0] ro        :0

part[1] name      :env-redund
part[1] classname :DISK
part[1] addrlo    :0x28
part[1] lenlo     :0x8
part[1] user_type :32768
part[1] keydata   :0
part[1] ro        :0

part[2] name      :arm-lpsram
part[2] classname :DISK
part[2] addrlo    :0x30
part[2] lenlo     :0x960
part[2] user_type :32768
part[2] keydata   :0
part[2] ro        :0

part[3] name      :rv-lpsram
part[3] classname :DISK
part[3] addrlo    :0x990
part[3] lenlo     :0xfa0
part[3] user_type :32768
part[3] keydata   :0
part[3] ro        :0

part[4] name      :dsp-hpsram
part[4] classname :DISK
part[4] addrlo    :0x1930
part[4] lenlo     :0x640
part[4] user_type :32768
part[4] keydata   :0
part[4] ro        :0

part[5] name      :rtos-xip
part[5] classname :DISK
part[5] addrlo    :0x1f70
part[5] lenlo     :0x1388
part[5] user_type :32768
part[5] keydata   :0
part[5] ro        :0

part[6] name      :arm-b
part[6] classname :DISK
part[6] addrlo    :0x32f8
part[6] lenlo     :0x960
part[6] user_type :32768
part[6] keydata   :0
part[6] ro        :0

part[7] name      :config
part[7] classname :DISK
part[7] addrlo    :0x3c58
part[7] lenlo     :0x20
part[7] user_type :32768
part[7] keydata   :0
part[7] ro        :0

part[8] name      :UDISK
part[8] classname :DISK
part[8] addrlo    :0x3c78
part[8] lenlo     :0x0
part[8] user_type :33024
part[8] keydata   :0
part[8] ro        :0

need erase flash: 18
The Chip Erase size is: 16M ...
SUNXI_EFEX_MBR_TAG
mbr size = 0x4000
write primary GPT success
spinor: skip backup GPT
[43.156]update partition map
FEX_CMD_fes_verify_status
FEX_CMD_fes_verify last err=0
FEX_CMD_fes_verify_value, start 0x20, size high 0x0:low 0x1000
FEX_CMD_fes_verify_value 0x8c999e79
FEX_CMD_fes_verify_value, start 0x28, size high 0x0:low 0x1000
FEX_CMD_fes_verify_value 0x8c999e79
FEX_CMD_fes_verify_value, start 0x30, size high 0x0:low 0x121e48
FEX_CMD_fes_verify_value 0xe3775740
FEX_CMD_fes_verify_value, start 0x1930, size high 0x0:low 0x7a168
FEX_CMD_fes_verify_value 0x3b80dabd
FEX_CMD_fes_verify_value, start 0x1f70, size high 0x0:low 0x23c230
FEX_CMD_fes_verify_value 0x8bdd937b
FEX_CMD_fes_verify_value, start 0x32f8, size high 0x0:low 0xe8338
FEX_CMD_fes_verify_value 0x3e12775c
FEX_CMD_fes_verify_value, start 0x3c58, size high 0x0:low 0x3c00
FEX_CMD_fes_verify_value 0xe5de21c
flash sectors: 0x8000
FEX_CMD_fes_verify_value, start 0x3c78, size high 0x0:low 0x7e5400
FEX_CMD_fes_verify_value 0x4536d51f
bootfile_mode=4
SUNXI_EFEX_BOOT1_TAG
boot1 size = 0x8000, max size = 0x80000
uboot size = 0x124000
storage type = 3
skip toc1
FEX_CMD_fes_verify_status
FEX_CMD_fes_verify last err=0
bootfile_mode=4
SUNXI_EFEX_BOOT0_TAG
boot0 size = 0xc080
storage type = 3
burn first boot0 ok!
burn boot0 redund ok!
FEX_CMD_fes_verify_status
FEX_CMD_fes_verify last err=0
sunxi_efex_next_action=2
exit usb
next work 2
SUNXI_UPDATE_NEXT_ACTION_REBOOT
free spi flash
UART 烧写
R128 支持使用 UART 烧写系统。
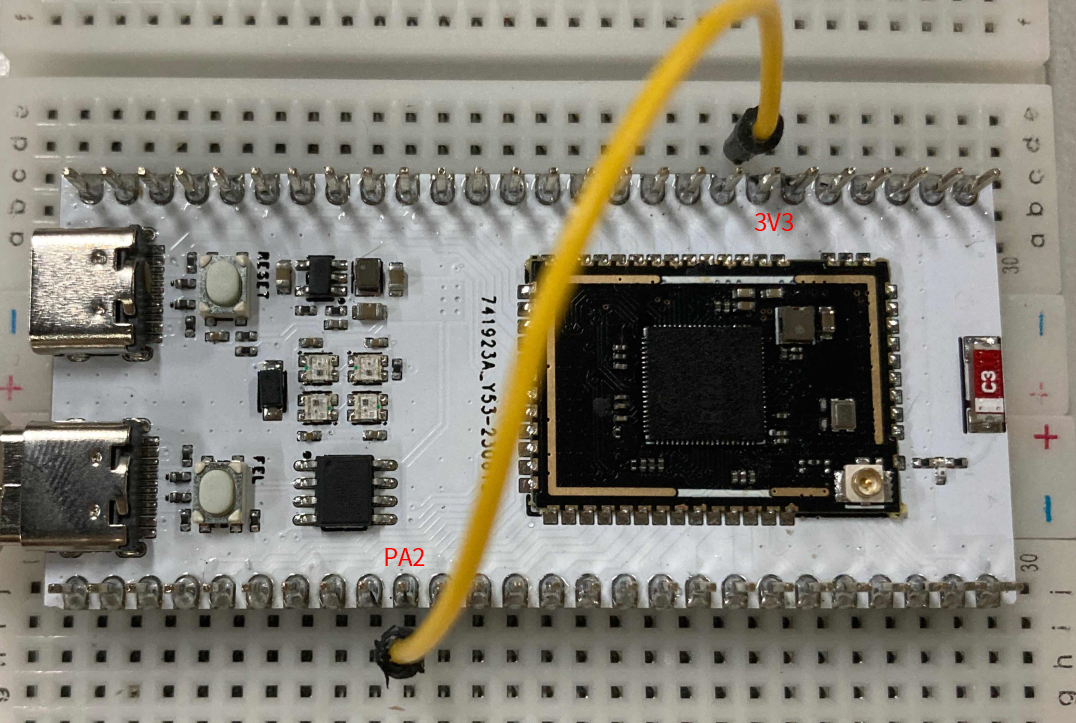
请注意:R128 Module 在硬件上下拉了 PA2 引脚,默认配置为USB下载模式。如果希望使用 UART 下载需要摘除 PA2 下拉电阻,或者外部上拉 PA2 到 3V3
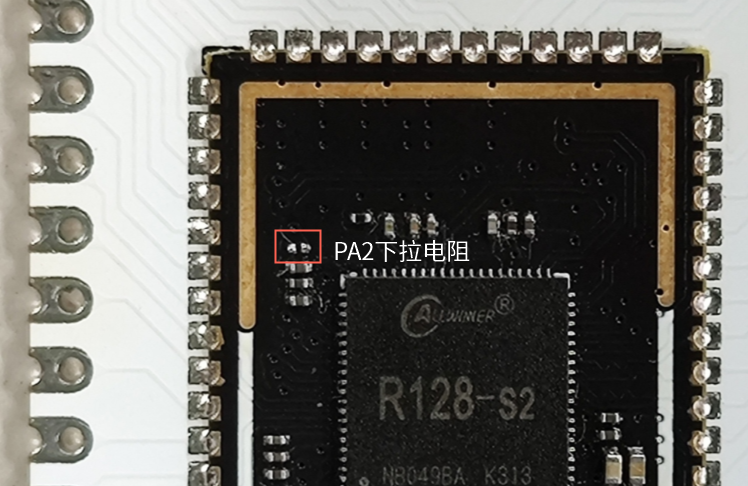
PA2 下拉电阻为 47K,可以直接上拉 PA2 到 3V3 进入UART下载模式
UART 下载设置
- 打开
PhoenixMC点击刷新,注意在下载过程中请断开各类串口监视器,不能占用串口,否则刷新找不到对应串口。 - 配置串口波特率,一般选择 1500000 即可
如果选择太高的波特率会导致通讯错误,板载的 CH340C 仅支持最大2000000波特率
- 点击
刷新选择对应的串口 - 点击调试进入调试界面
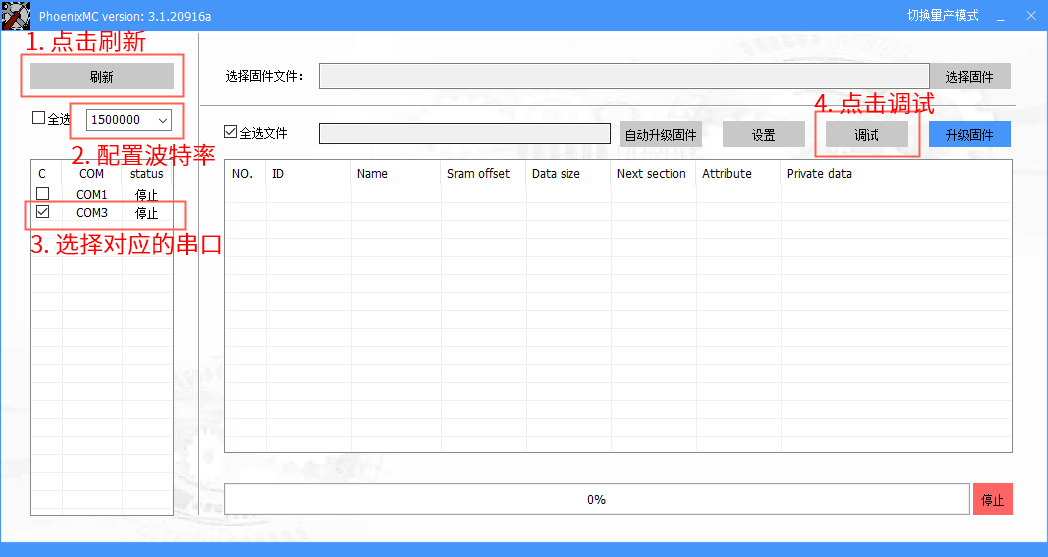
如果出现 Open uart error! 则表示没有关闭串口助手或者选择错了串口。

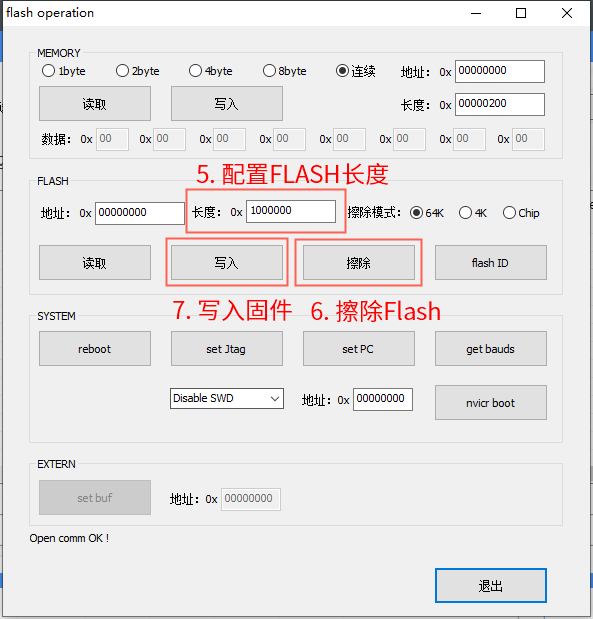
- 配置 Flash 长度,例如 R128 内置 16M NOR Flash,这里就填入
0x1000000也就是 16M 长度 - 烧写前先擦除 Flash
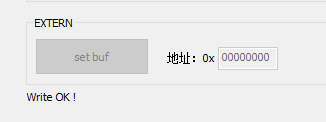
- 点击写入
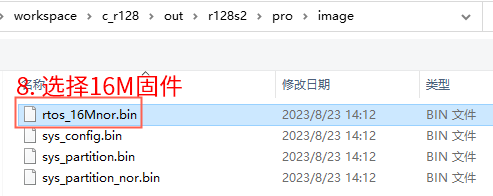
- 选择 16M 固件,注意这个固件后缀名是
.bin,不是 USB 烧写的.img文件
注意:USB 烧写使用的是专有格式,需要 PhoenixSuit 解析并烧录,UART 烧写使用的是通用格式,为内置 SPI NOR 的镜像文件。
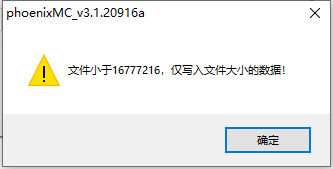
- 提示文件较小,点击确定即可
- 开始烧写

- 烧写完成,下载结束
UART mBoot 通讯协议
| Host | Main-CMD | Sub-CMD | CMD Value | Description | Remarks |
|---|---|---|---|---|---|
| PC | 0x00 | 0x00 | 0x00 | Read 1 byte | |
| PC | 0x00 | 0x01 | 0x01 | Write 1 byte | |
| PC | 0x00 | 0x02 | 0x02 | Read 2 bytes | |
| PC | 0x00 | 0x03 | 0x03 | Write 2 bytes | |
| PC | 0x00 | 0x04 | 0x04 | Read 4 bytes | |
| PC | 0x00 | 0x05 | 0x05 | Write 4 bytes | |
| PC | 0x00 | 0x06 | 0x06 | Read 8 bytes | |
| PC | 0x00 | 0x07 | 0x07 | Write 8 bytes | |
| PC | 0x01 | 0x00 | 0x08 | Read n bytes | |
| PC | 0x01 | 0x01 | 0x09 | Write n bytes | |
| PC | 0x02 | 0x00 | 0x10 | Change the UART transmission condition | |
| PC | 0x02 | 0x01 | 0x11 | Enable/Disable JTAG | |
| PC | 0x02 | 0x02 | 0x12 | reboot | |
| PC | 0x02 | 0x03 | 0x13 | Set PC pointer | |
| PC | 0x02 | 0x04 | 0x14 | Enable/disable MCU transmission and validation | |
| PC | 0x02 | 0x05 | 0x15 | Obtain baud rate list | |
| PC | 0x02 | 0x06 | 0x16 | Modify the buffer | |
| PC | 0x00 | 0x00 | 0x18 | Obtain flash information | |
| PC | 0x01 | 0x01 | 0x19 | Chip erase | |
| PC | 0x01 | 0x02 | 0x1A | Read n sectors | |
| PC | 0x01 | 0x03 | 0x1B | Write n sectors | |
| PC | 0x01 | 0x04 | 0x1C | Obtain flash information | |
| PC | 0x01 | 0x05 | 0x1D | Chip erase | |
| PC | 0x01 | 0x06 | 0x1E | Read n sectors | |
| PC | 0x01 | 0x07 | 0x1F | Write n sectors | |
| MCU | 0x00 | 0x00 | Send message to PC |
烧录流程
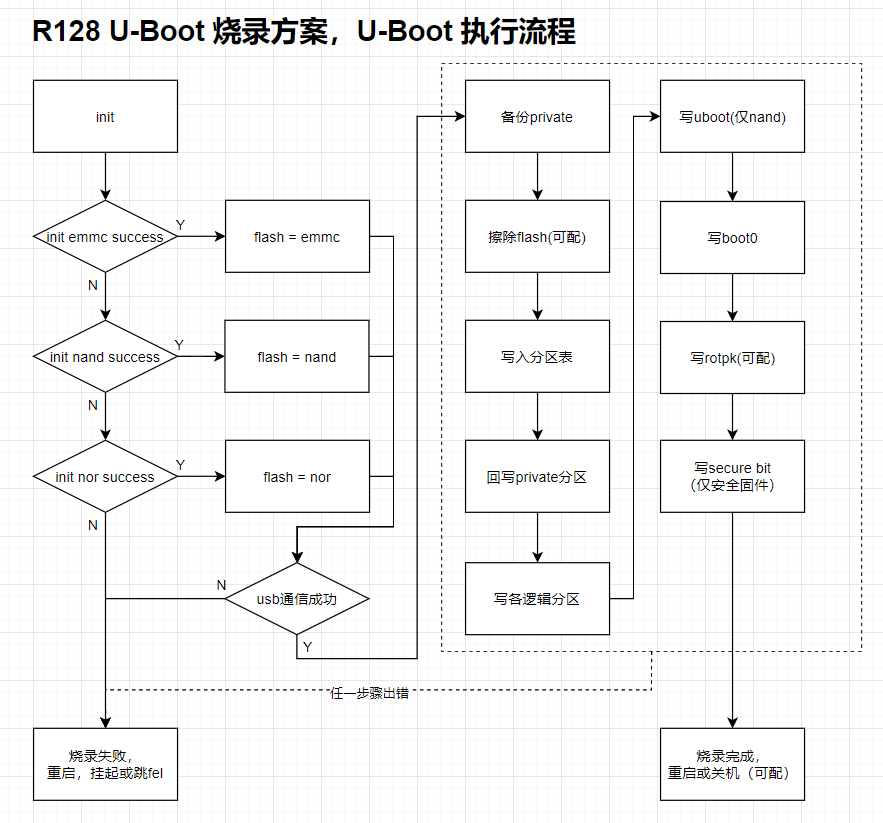
U-Boot 烧录执行流程
烧录速度对比
| 烧录方式 | 擦除速度 | 烧录速度 |
|---|---|---|
| USB | 30s | 38s |
| UART (1500000) | 60s | 205s |
| UART (115200) | 60s | 1466s |